Cannot connect to UEC Wireless (campus wireless LAN)
The following are possible causes.
Also, please respond to the UEC Wireless User Survey for more details.
UEC Wireless (campus wireless LAN) connection is interrupted immediately
Change the settings using the same procedure as The wireless LAN standard supported by the device does not correspond to the UEC Wireless standard (802.11ac) .
Also, if you are using a smartphone, please try restarting your device.
Hint
You may be able to connect to other SSIDs. Also, simply turning off WiFi often does not restore the problem.
I was able to connect to UEC Wireless until recently, but now I can no longer connect.
The following are possible causes.
You moved while connected to the previous access point and then left the access point.
Please turn off the Wireless connection and then turn it on again to reconnect.
Access is concentrated on the connected access point
It is possible that the access point you are trying to connect to is experiencing heavy access, making it impossible to connect. If you are unable to connect, please use UEC Wireless II.
The access point is not installed or is being used in an unsupported area.
Please check the location of the access point from the UEC Wireless support area and connect to UECWireless within the support area. Even if you are within the support area, you may not be able to connect if the reception signal is weak. In that case, please change the location and try again.
The computer’s time is significantly different.
If your computer’s time is significantly different, authentication using your UEC account will not be performed correctly. Please check the time on your computer.
You have not changed your UEC account password since 2014
If you have not changed your UEC account password since March 2014, you will not be able to use Windows, VPN, UEC Wireless, and UEC wired authentication LAN in the Information Technology Center’s training classrooms from March 2018 onwards. It becomes.
情報基盤センターでは 2014 年 3 月に新たな認証システムを導入いたしましたが, 新認証システムへパスワードを伝搬させるため, パスワードの変更 してください.
The wireless LAN standard supported by the device does not correspond to the UEC Wireless standard (802.11ac)
Some of the latest equipment may be set to give priority to newer standards (such as 802.11ax) than the equipment used by the center. In that case, please check the settings using the following method.
Press the Windows key to open the start menu
Type Device Manager to open Device Manager
Right-click the WiFi adapter in Network adapters and click Properties(R).
Select the wireless mode from Properties (P) on the Advanced settings tab.
If Value(V) is set to IEEE 802.11ax or IEEE 802.11ac, Select IEEE 802.11n or something containing it and click OK
Other causes
For some reason, your PC or smartphone may remember incorrect ID, password, or other information, and you may not be able to connect even if the settings appear to be correct.
To delete the credentials stored in the OS, please delete the [UECWireless] profile according to the following example. After deleting it, please set up the device connection again according to How to setting UEC Wireless.
- Example of how to delete a profile Android:
Settings \(\Rightarrow\) Wi-Fi \(\Rightarrow\) Press and hold UECWireless \(\Rightarrow\) Delete network
- Example of how to delete a profile iOS:
Settings \(\Rightarrow\) Wi-Fi \(\Rightarrow\) Select UECWireless \(\Rightarrow\) Delete this network setting
- Example of how to delete a profile macOS:
System preferences \(\Rightarrow\) Network \(\Rightarrow\) Select Wi-Fi and Click 詳細… \(\Rightarrow\) Select UECWireless from the networks you have used \(\Rightarrow\) Click - at the bottom left \(\Rightarrow\) OK \(\Rightarrow\) Applicable
- Example of how to delete a profile Windows 8.1:
Right-click UECWireless from the Internet access icon \(\Rightarrow\) Delete this connection/Delete this network
- Example of how to delete a profile Windows 10:
Start menu Settings \(\Rightarrow\) Network and Internet \(\Rightarrow\) Wi-Fi \(\Rightarrow\) Managing known networks \(\Rightarrow\) Click on UECWireless \(\Rightarrow\) 削除
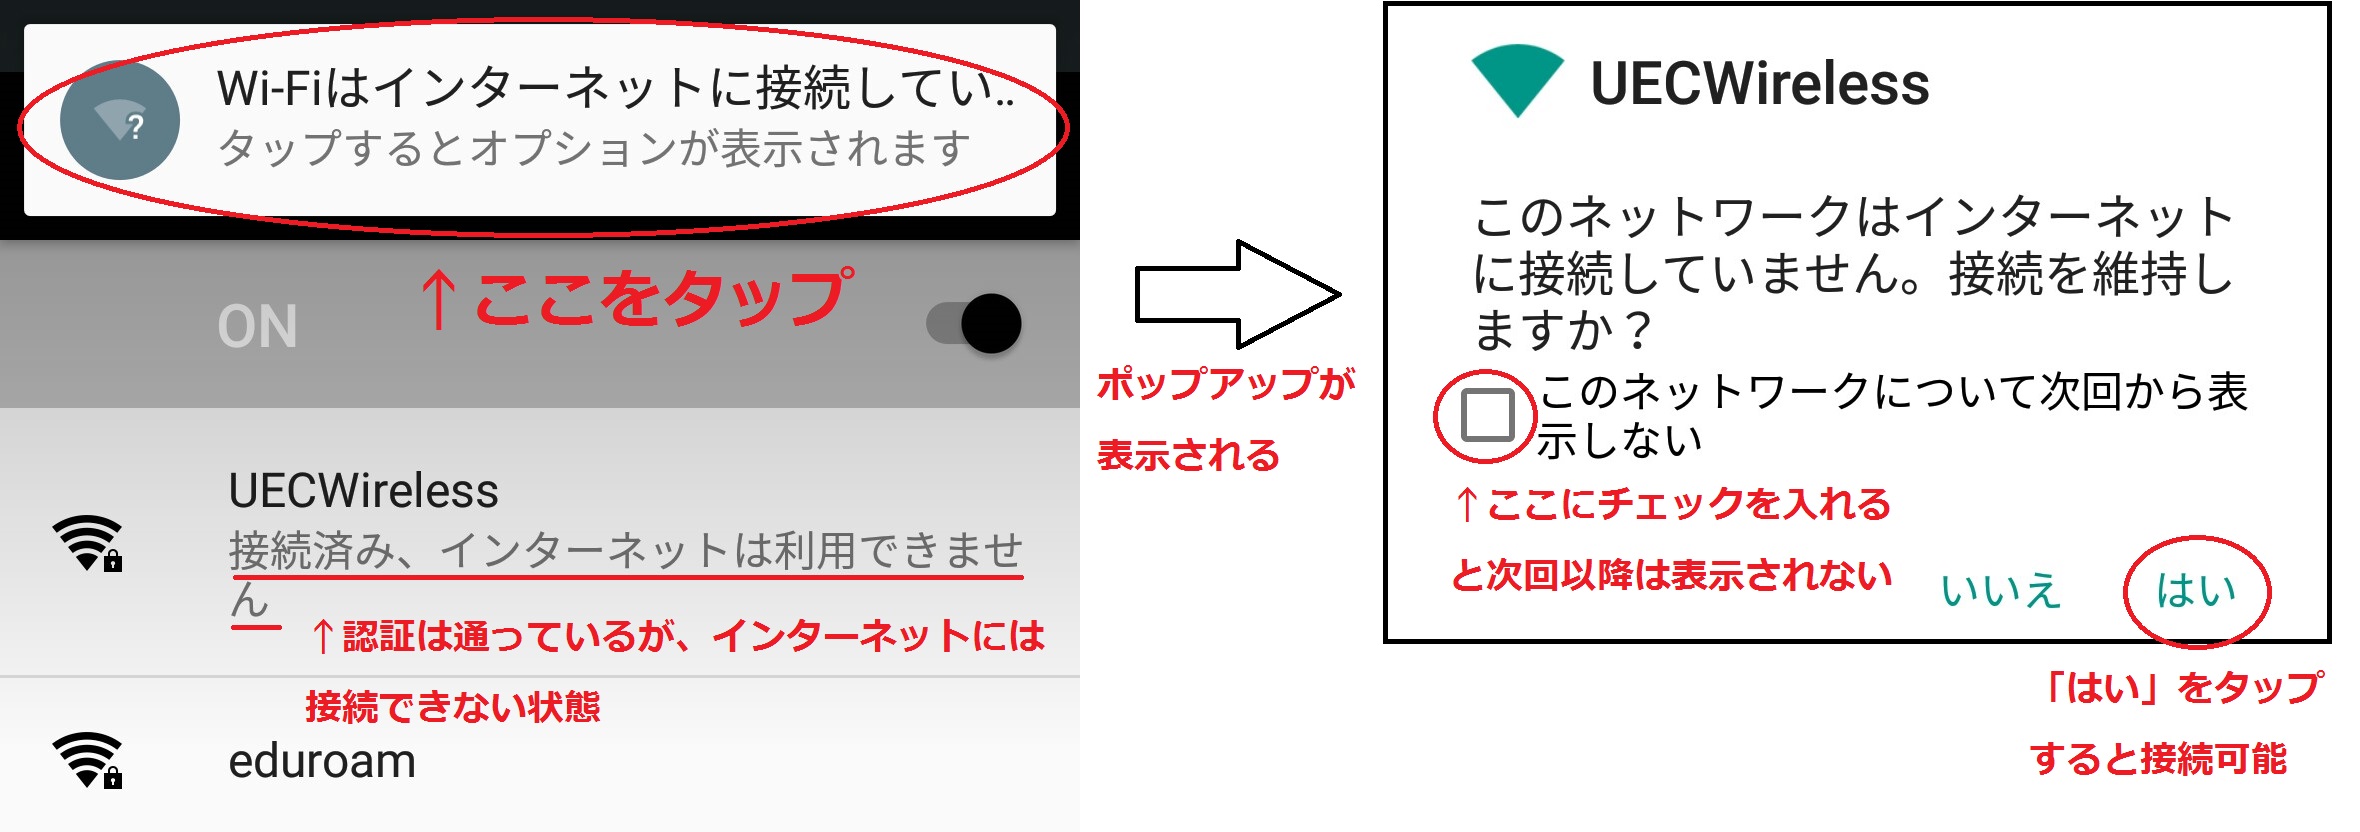
Connects to UEC Wireless (campus wireless LAN) but cannot connect to the Internet
The following are possible causes.
There is a problem that some devices cannot be used.
Although it is possible to connect with some devices, there are instances where it is not possible to connect to the Internet. As of April 2023, this event has been confirmed on the following devices.
Google Pixel 6, 6a, 7
Mac Book Pro (some)
iPad(some)
Please use UEC Wireless-II until the problem is resolved. For the setting method, please refer to UECWireless-II Settings (Temporary Operation).
DNS server settings are incorrect
DNS errors may occur due to incorrect DNS server settings. UEC Wireless cannot refer to off-campus DNS servers. Please check the DNS settings by following the steps below.
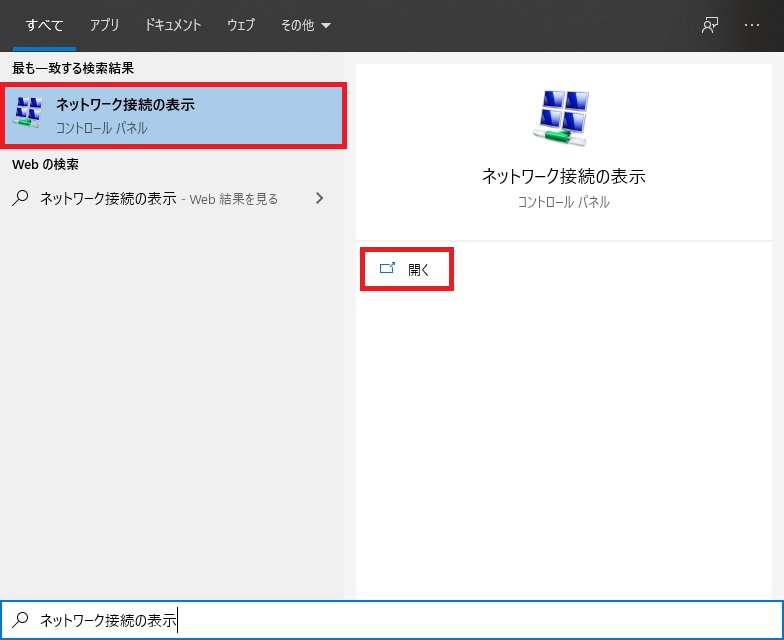
Press the Windows key to open the start menu
Type View network connections and click Open
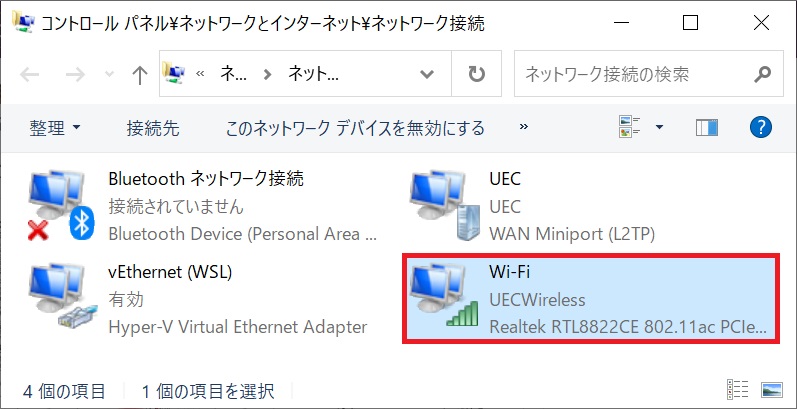
Select Wi-Fi, right-click and click Properties(R)
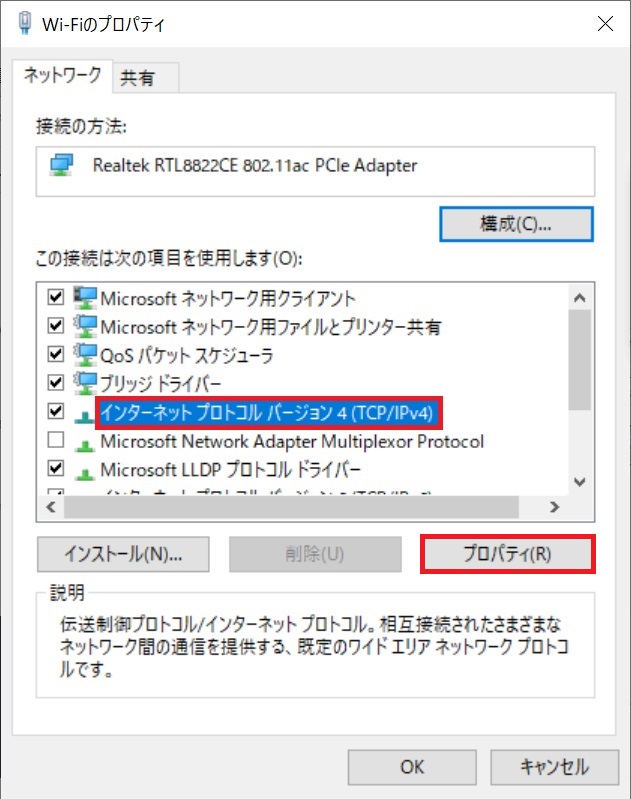
Select Internet Protocol Version 4 (TCP/IPv4) and click Properties(P)
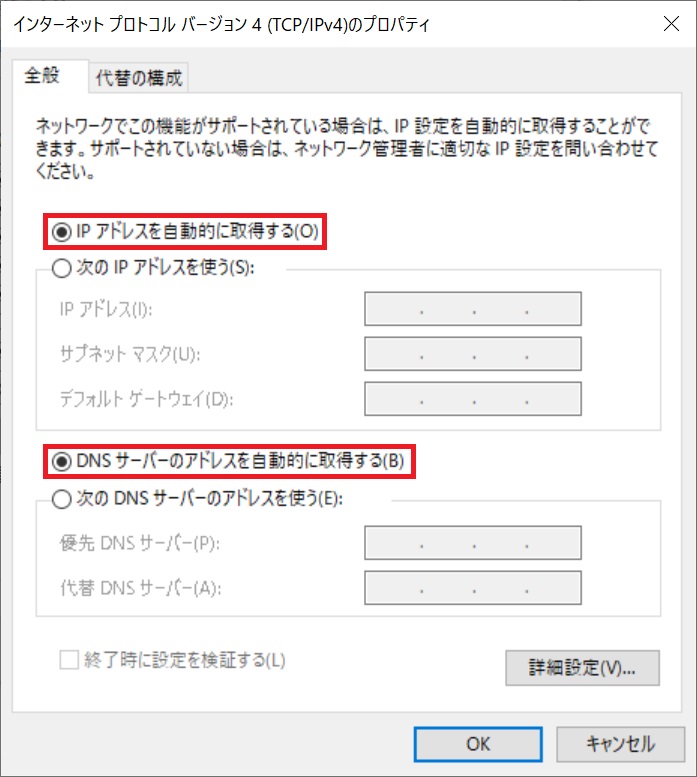
Make sure Obtain IP address automatically (O) and Obtain DNS server address automatically (B) are selected. If not selected, select it.
Referring to an off-campus DNS server
If you are using DNS over HTTPS (DoH), which attempts to communicate directly with an off-campus DNS server, you will not be able to access off-campus sites. Please refer to the URL below and cancel the settings.
Google Chrome
https://support.google.com/chrome/answer/9890866?hl=en&co=GENIE.Platform%3DDesktop
Firefox
After I entered graduate school, I could no longer connect to UEC Wireless.
You may not be able to connect if you still have the UEC account information you used as an undergraduate student. Please refer to the method for deleting the profile under Other causes , delete the profile, and then try connecting again with a new UEC account.
When I tried to connect to UEC Wireless on my Android smartphone, I was asked to install a CA certificate.
A message like this may be displayed when connecting to UEC Wireless with an old smartphone running Android 4.3 or earlier.
Android versions earlier than Android 7.2 (as of October 1, 2020) do not have security measures supported by the manufacturer, so please do not connect them to the university network.
If this message appears even though you are using a relatively new Android,
Please install using one of the following methods.The required certificate is Security Communication RootCA2. In either case, the CA certificate file must be in PEM format and have the file extension .crt.
Download the CA certificate, convert it with OpenSSL, and then install it on the device
Export the CA certificate from Windows and install a copy of it on your device
Download the CA certificate, convert it with OpenSSL, and then install it on the device
Obtain the file SCRoot2ca.cer from the page provided by SECOM https://repository.secomtrust.net/SC-Root2/ off-campus.
Prepare an environment where the openssl command can be used, and use the following command to convert to PEM format.
$ openssl x509 -inform der -in SCRoot2ca.cer -outform pem -out SCRoot2ca.crt
Export the CA certificate from Windows and install a copy of it on your device
You can export the certificate from Windows and install a copy of it on your Android device using the following steps.
Internet option \(\Rightarrow\) Contents \(\Rightarrow\) Certificate \(\Rightarrow\) Trusted Root Certification Authorities \(\Rightarrow\) Select Security Communication RootCA2 , Press down Export
The Certificate Export Wizard will open, Select Base 64 encoded X.509 (.CER) in the Export File Format field. Export with file name SCRoot2ca.crt .
The extension .cer is added to the name of the output file, Delete the extra .cer extension after output and rename the file to SCRoot2ca.crt .
Copy the created SCRoot2ca.crt file to your smartphone, and select:guilabel:Location information and security (or Other settings \(\Rightarrow\) Lock and security , etc.) \(\Rightarrow\) Install from microSD (or Install from storage , etc.)from the smartphone’s settings menu. Select SCRoot2ca from the menu that appears and install Once the installation is complete, the SCRoot2ca.crt file will be deleted.
Note
The item names on the setting screen may differ depending on the model. Also, depending on the model, you may be able to install the certificate from the WiFi settings screen.
Note
On Android 4.4 and later, a warning will appear the first time you connect, but you can connect without installing a CA certificate. However, this warning display may be difficult to understand and may be skipped. If after setting the CA certificate item to “Do not verify” and entering each setting information and tapping Connect, the message “Connected, but the Internet is not available” is displayed, wait a moment and the message “Wi-Fi is not available” will appear at the top of the screen. You will receive a notification that says ``You are not connected to the Internet…’’, so tap the notification to display options. A pop-up will appear; select “Yes” to connect to UEC Wireless.
When I initialized my PC, UEC Wireless, VPN, and Thunderbird became unusable.
“Please try changing your UEC account password by following the instructions in Changing your UEC account password . The password is currently 12 digits, but previously it was 10 digits, so there is a possibility that this is the reason why you are unable to connect.
Unable to access UECWireless from smartphone or macOS
As a temporary support, please use the 2.4GHz band dedicated SSID UECWireless-II. The connection method is the same as UEC Wireless. For details, please refer to UECWireless-II Settings (Temporary Operation).
As of April 2023, we have confirmed that Google Pixel 6 and later devices and Apple Silicon M2 Macs are unable to connect to UEC Wireless. We have requested the manufacturer to fix this problem.
In addition, for improvements, we would appreciate it if you could report any problems using the UEC Wireless User Survey (*UEC cloud account only) . Thank you for your cooperation.