Virtual Domain Server Management Guide for Email Administrators
1. Services available on the virtual domain server mail server
Receiving emails via POP3s (only from within the university)
Mailing list
Email forwarding
You can manage these (registration, editing (including password changes), deletion, etc. related to the above services) using a web browser.
Note
Please use mx-delivery.uec.ac.jp for the sending service (SMTP).
2. Management tasks for email administrators
The email administrator’s administrative tasks mainly fall into the following four categories.
Changing the initial settings of the administrator (postmaster) user (required, for the first time only)
Adding, modifying, and deleting POP accounts
Adding, modifying, and deleting mailing lists
Adding, modifying, and deleting forwarding destinations (forwarding accounts)
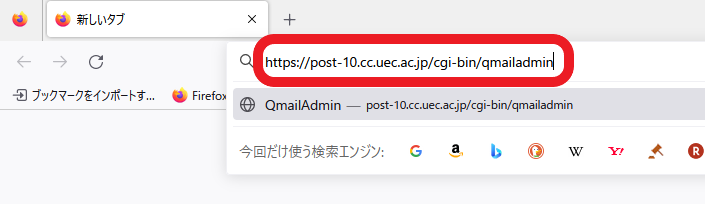
Use a web browser to access the management screen of the relevant virtual domain server. The URL is below. Access is only possible from within the university.
If you are logging in for the first time after registration, please make the settings according to 2.1 Initial settings for administrator (postmaster) users . If you have already set it up, please read 2.2 Adding/Modifying/Deleting POP Accounts .
2.1 Initial settings for administrator (postmaster) users
The first thing to do is to change the following settings for the administrator (postmaster) user.
Changing the initial password
routing
Note
Please do not enable 不在通知設定 (the out-of-office notification setting) at the bottom of the settings screen.
The setting method is as follows.
2.1.1 How to log in
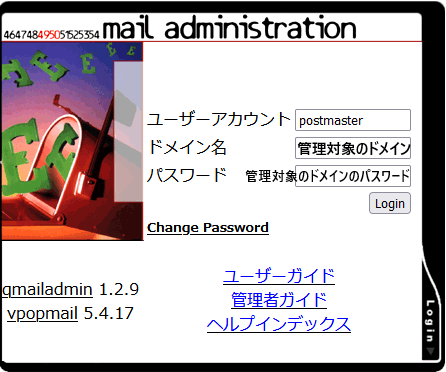
Access the management screen of the relevant virtual domain server. (This guide uses the case where post-10.cc.uec.ac.jp is selected as an example.)
The login screen will be displayed. The information required to log in is as follows.
アカウント
ユーザーアカウント
postmasterドメイン
ドメイン名 管理対象のドメイン名(本ガイドでは,仮のドメイン名example.uec.ac.jpを使用した場合を例とします)
パスワード(Password)
管理対象のドメインのパスワード
Note
The administrator account will always be the postmaster. Also, if you are logging in for the first time, log in using the initial password sent to you in advance and change your password first.
Note
In this guide, we will use the temporary domain name example.uec.ac.jp as an example.
Click Login after entering the information to log in. If the screen changes to the image, you have successfully logged in.
How to change the initial password is as shown in 2.1.2 How to change the password .
2.1.2 How to change the password
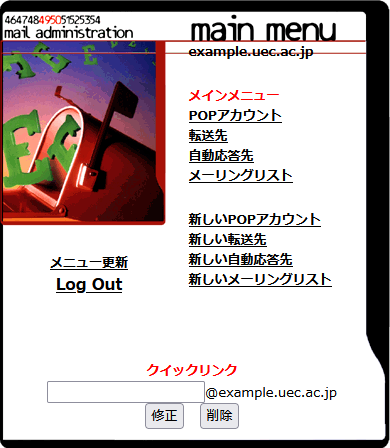
After logging in, click POPアカウント (POP Account) on the main menu.
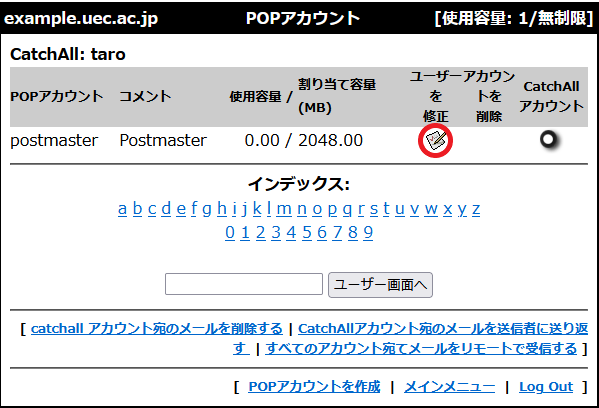
Click the icon in 「ユーザーを修正」(the Modify User) column for postmaster.
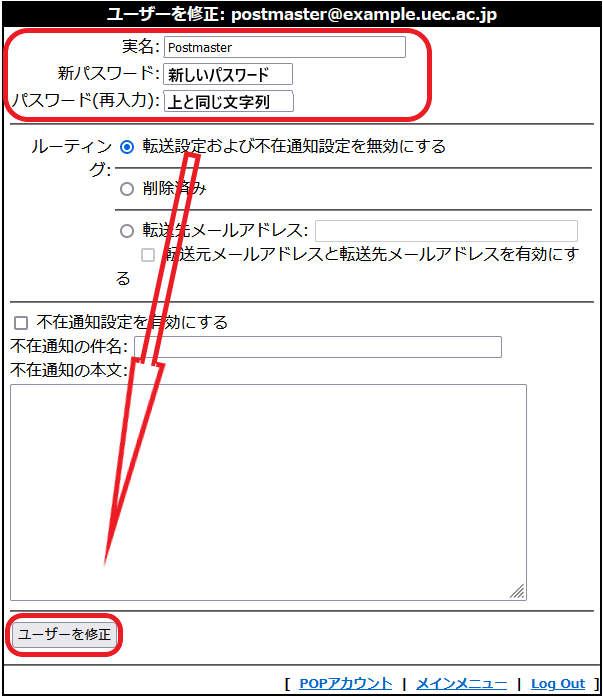
You will be redirected to the postmaster 「ユーザーを修正」(the Modify User) screen. Enter the new password in 「新パスワード」(New password) and 「パスワード(再入力)」(Password (re-enter)) on the screen, and click ユーザーを修正 (Modify user) at the bottom to change the password.
Hint
Please enter the same string in the 「新パスワード」(New password) and 「パスワード(再入力)」(Password (re-enter)) fields.
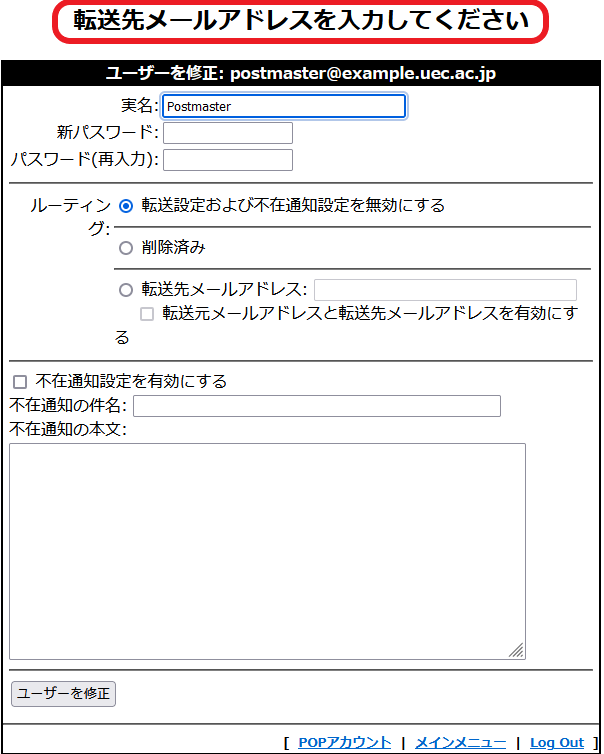
2.1.3 Postmaster mail routing settings
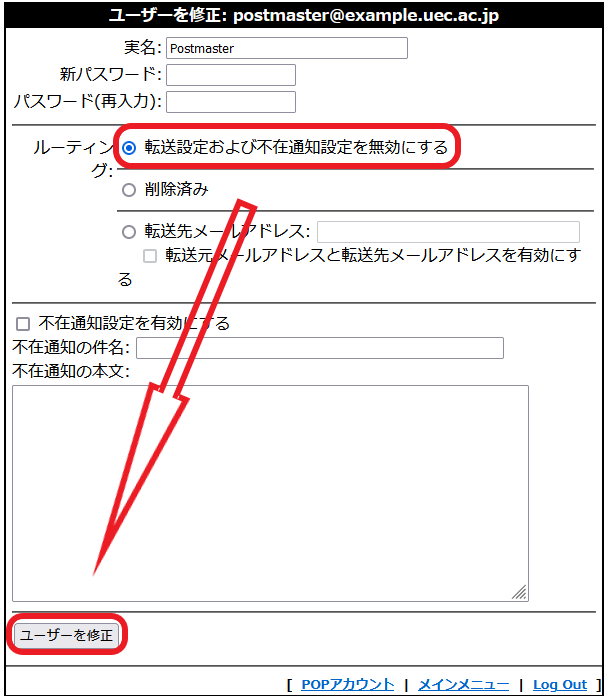
Set the processing method (receiving on this server, forwarding, or both) for mail that reaches the mail administrator (postmaster) of this domain.
However, due to the limitations on the usable disk space of the mail server service itself, we recommend settings when forwarding to other email addresses.
If you configure settings to leave emails on other servers, you may not be able to receive new emails due to server capacity limitations.
The setting procedure is as follows.
Move to ユーザーを修正 (the Modify user) screen in 2.1.2 How to change the password .
Configure the items according to the method you want to configure.
Caution
Although 不在通知設定 (the out-of-office notification setting) exists as a function, please do not enable it.
- If you want to receive email on this server
If you want to receive emails using POP3s on this server, turn on 「転送設定および不在通知設定を無効にする」(Disable forwarding settings and the out-of-office notification setting) (default setting).
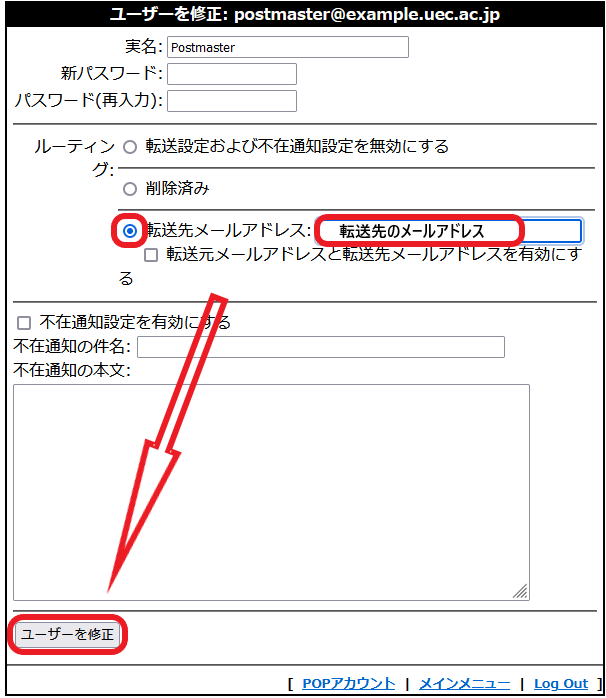
- When forwarding to another email address
If you want to forward to another email address, enable 「転送先メールアドレス」(Forwarding email address) and set that email address in the 「転送先メールアドレス」(Forwarding email address) field.
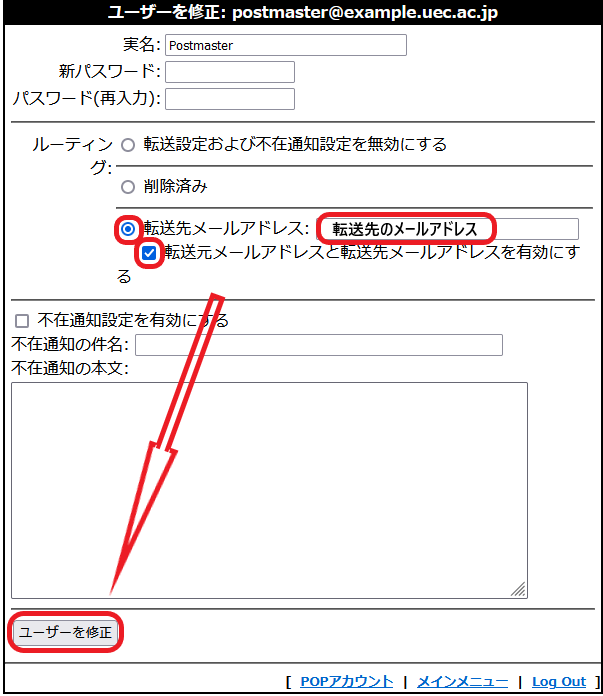
- When setting both (receiving on this mail server and forwarding to another email address)
In this case, make the same settings as above for [When forwarding to another email address] and enable 「転送元メールアドレスと転送先メールアドレスを有効にする」(Enable forwarding source and destination email addresses.)
Once the settings are complete, click the ユーザーを修正 (Modify User) button.The page will load, but the screen will not move.
If you return to the list from 「POPアカウント」(POP Account) and open the correction screen again, the item you selected earlier will be selected. If you can confirm this status, the settings have been completed.
Note
If you forget to enter your email address, an error message will be displayed at the top of the screen as shown in the image.
Clicking on 「メインメニュー」(Main Menu) will take you to the main menu.Please make sure that all users are aware of this.
2.1.4 Email address settings for email management
Register the email address required for domain email management. It is said that the following three email addresses are required for email management.
postmaster
mailer-daemon
abuse
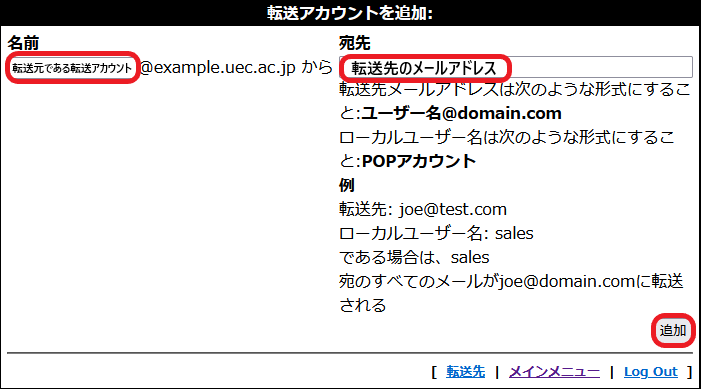
To make settings, click 「新しい転送先」(New forwarding destination) from the main menu and go to the 「転送アカウントを追加」(Add forwarding account) screen.
Enter the following information and click the 追加 (Add) button.
名前(Name) |
Forwarding account from which email is forwarded |
宛先(Address) |
Forwarding email address |
Since the postmaster has already been registered, register the forwarding accounts mailer-daemon and abuse, and set the forwarding destination of each to postmaster .
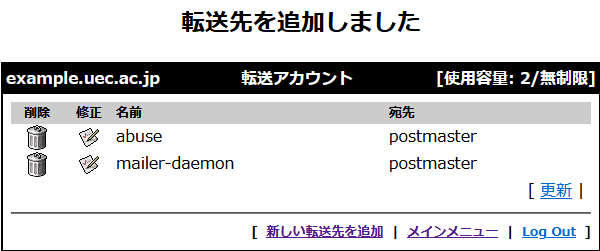
When the additional settings are completed, the screen will change to the one shown below and the settings will be completed.
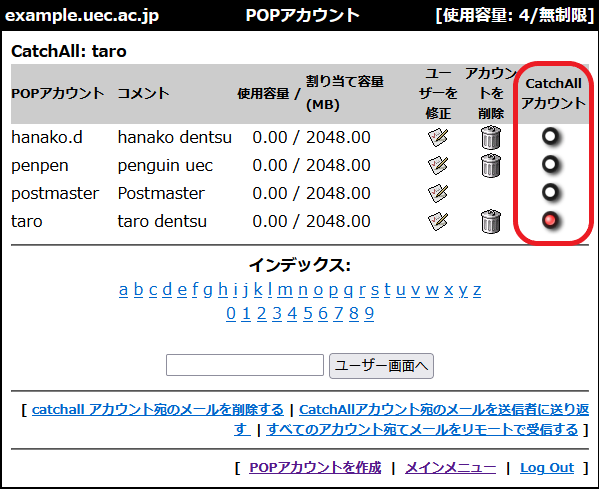
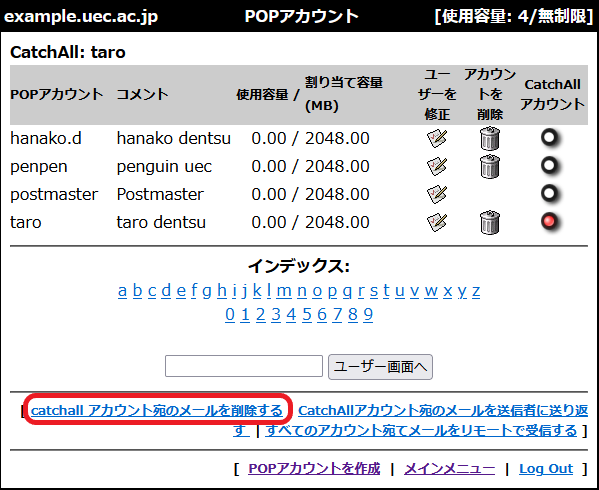
2.1.5 CatchAll Account
A CatchAll account refers to all emails sent to a certain domain whose recipients do not have a POP account. This email is usually user unknown.
This CatchAll can be set to one of the following.
- Set the CatchAll account radio button on the POP account management screen.
If you configure this setting, all emails addressed to a POP account that does not exist for that domain will be delivered to the user who has set the CatchAll account radio button. No error email will be sent to the sender.
Also, the specified user (presumably the administrator of the domain) must manually reply to the error email. However, it is possible to understand what kind of error is occurring.
- Click 「catchallアカウント宛のメールを削除する」(Delete emails addressed to catchall account) at the bottom of the POP account management screen.
If you configure this setting, all emails addressed to POP accounts that do not exist for that domain will be deleted. No error email will be sent to the sender.
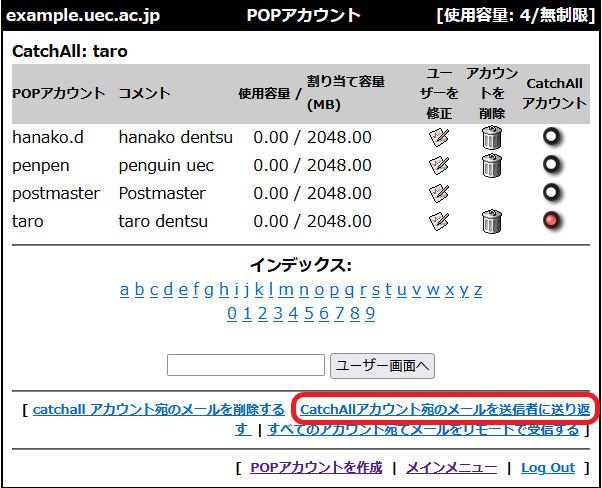
- Click 「catchallアカウント宛のメールを送信者に送り返す」(Return emails addressed to catchall account to sender) at the bottom of the POP account management screen.
If you configure this setting, emails addressed to a POP account that does not exist for that domain will be returned to the sender as an error email.
Also, the sender can understand that the email he/she sent was in error. However, the domain administrator cannot understand what kind of error is occurring.
- Click 「全てのアカウント宛てメールをリモートで受信する」(Remotely receive emails addressed to your CatchAll account).
If you configure this setting, all emails addressed to POP accounts that do not exist for that domain will be re-delivered to the configured email address. No error email will be sent to the sender.
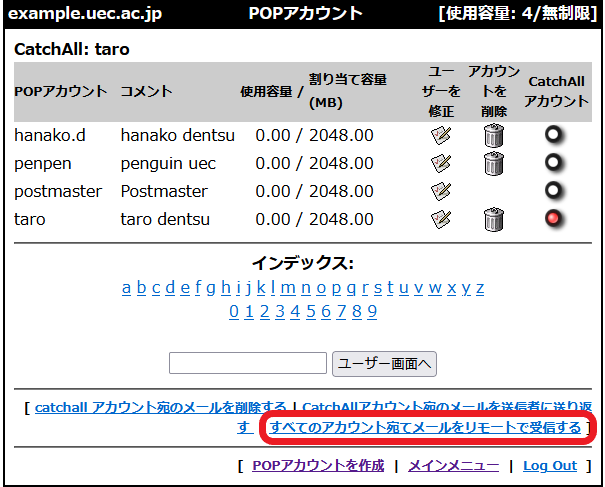
The Information Technology Center recommends setting 1. Set CatchAll on the postmaster, or create a POP account called catchall and set CatchAll, Alternatively, we recommend setting up forwarding so that the domain administrator can read the email.
If you do not want to receive all emails from destinations that do not have a POP account using CatchAll, please set 4. and set the 「リモートで受信するCatchAllアドレス」(Remotely Receive CatchAll Address) to sinkhole@uec.ac.jp. It will be temporarily saved at the Information Technology Center.
This completes the initial settings for the email administrator.
2.2 Adding, modifying, and deleting POP accounts
2.2.1 Adding POP accounts
The addition method is as follows. If necessary, the registration process may be simpler if you first refer to 2.3 Adding/Deleting Mailing Lists and make additional settings as necessary.
Click “New POP Account” on the main menu and do this on the “Add POP Account” screen.
Enter the following information and click 追加 (Add).
POPアカウント(POP account)
Email address to register (@ is included, so you don’t need to enter it)
パスワード(Password)
初期パスワード(initial password)
Password (re-enter)
same string as above
実名
Real name (Only English characters are available)
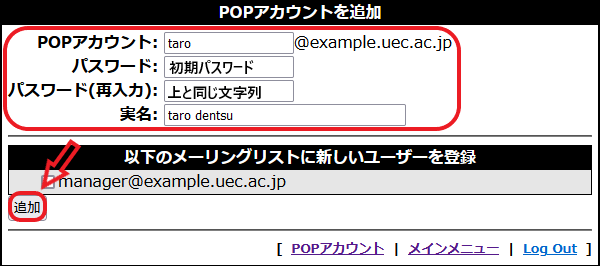
On the 「POPアカウントを追加」(Add POP Account) screen, check and add a mailing list under 「以下のメーリングリストに新しいユーザーを登録」(Register a new user to the following mailing lists) to register the POP account to the checked mailing list.
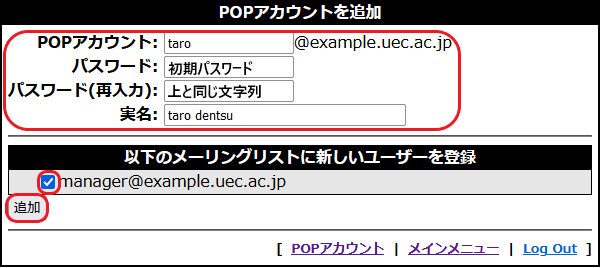
You will be moved to the POP list screen and will see that a new POP account has been registered.
Caution
The name of the POP account to be registered must meet the following requirements.
Accounts with only one character cannot be used. (Because the system has reserved it)
The first character of the account must be [0-9a-zA-Z]
The characters that can be used in the account are alphanumeric characters, . (dot), _ (underscore), - (hyphen).
The account must not include -default, -owner, or -request. (Because the system has reserved it)
Regarding accounts, forwarding accounts, and mailing list names, there are restrictions as described in 1. Services available on the virtual domain server mail server Notes. Please check again. If you make a mistake, it may cause malfunction.
Note
Please inform the user of the POP account and password. Also, the password is the initial password, so please be sure to change it before using it.
2.2.2 Deleting POP accounts
The method to delete a POP account is as follows. With this setting method, you can choose to “delete your POP account” or “migrate to a forwarding service.”
Click 「POPアカウント」(POP Account) on the main menu and do this on the 「POPアカウント」(POP Account) screen.
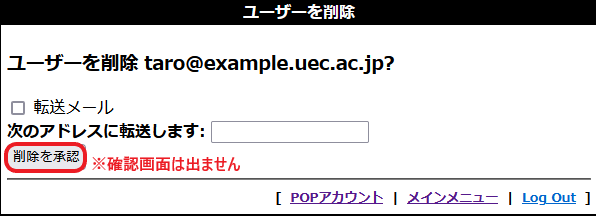
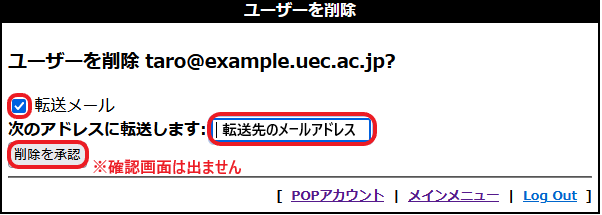
From the list screen, click the 「アカウントを削除」(Delete account) icon in the row of the POP account you want to delete, and you will be redirected to the 「ユーザを削除」(Delete user) screen.
On this screen, you can choose to “delete your POP account” or “migrate to a forwarding service.”
If you want to delete your POP account
Click the 削除を承認 (Confirm deletion) button to delete your POP account.
When moving to a forwarding service
By checking 「転送メール」(Forwarding email) and entering the forwarding email address in 「次のアドレスに転送します」(Forwarding to the following address), you can delete the POP account and add a forwarding account at the same time. After entering the information, click the 削除を承認 (Approve deletion) button to delete the POP account.
2.3 Adding/Deleting Mailing Lists
2.3.1 Adding Mailing Lists
You can add and create new mailing lists.
Click 「新しいメーリングリスト」(New Mailing List) on the main menu and configure settings on the 「メーリングリストを追加」(Add Mailing List) screen.
Please refer to the following for the setting details.
メーリングリスト名 (Mailing list name)
Enter the 「メーリングリスト名」(mailing list name) you want to specify in the input field.
リストオーナーのメールアドレス (List owner email address)
Enter the email address of the administrator of this mailing list.
プレフィックス (Prefix)
You can specify a string to be added to the subject of messages posted to the mailing list (half-width alphanumeric characters only).
ex) If you want “Subject: [EXAMPLE-ADM] …”, enter “EXAMPLE-ADM” in this input field.
メッセージの投稿 (Post a message)
You can select restrictions on posters when posting to mailing lists.
- 誰でも投稿できます(Anyone can post)
If this is enabled (checked), there are no restrictions on posting. Anyone can post.
- 参加者のみ投稿できます.参加者以外は宛先不明で返信されます(Only participants can post. Non-participants will receive a reply with an unknown address.)
Enabled by default If this is enabled (checked), only participants registered on this mailing list can post.
- 参加者のみ投稿できます.参加者以外は宛先不明で返信されます(Only participants can post. Non-participants will receive a reply with an unknown address.)
- 参加者のみ投稿できます.参加者以外はモデレータに問い合わせて承認を得ます(Only participants can post. Non-participants will contact the moderator for approval.)
If this is enabled (checked), only participants who are registered on this mailing list can post, and the post will be distributed after approval by the moderator.
- モデレータのみ投稿できます.モデレータ以外は宛先不明で返信されます(Only moderators can post. Anyone other than the moderator will be replied to as an unknown address.)
Only moderators can post.
- モデレータのみ投稿できます.モデレータ以外はモデレータに問い合わせて承認を得ます(Only moderators can post. If you are not a moderator, please contact the moderator for approval.)
Only moderators can post, but posts by people other than moderators will be distributed if approved by the moderator.
リストオプション (List options)
返信先 (Reply to)
You can specify the destination.
- 元の送信者(original sender)
If you select this, the email address of the sender (poster) will be the reply destination.
Enabled by default
- リスト全体(whole list)
If you select this, the email address on the mailing list will be the reply destination. For mailing lists used for discussions, etc., we recommend specifying “the entire list.”
- このアドレス(this address)
If you select this, the email address entered in the input field will be the reply destination.
- 各メッセージ終端にトレーラを付けます(Attach a trailer to the end of each message)
If this is enabled (checked), a trailer can be attached to the end of each message.
Disabled by default
- リストのダイジェスト版を設定します(リスト名-digestという名前)(Sets the digest version of the list (named list name-digest))
If this is enabled (checked), you can set a digest version of the list.
Disabled by default
- サービス要求がリスト名-requestに送信されます(ユーザーは,リスト名-subscribeやリスト名-unsubscribeだけではなく,リスト名-requestにもコマンドを送信できます)(A service request is sent to listname-request (users can send commands to listname-request as well as to listname-subscribe and listname-unsubscribe))
If this is enabled (checked), service requests can be sent to <list name>-request.
Enabled by default
リモート管理 (remote management)
- モデレータは,リモート管理が可能です.(Moderators can be managed remotely.)
If this is enabled (checked), you can manage your mailing list by entering commands in an email and sending it.
Disabled by default
- この設定をプライベートリストにします.(管理者のみが登録,登録解除,インデックスへのアクセスを行えます)(Make this setting a private list. (Only administrators can register, unregister, and access the index))
Make this setting a private list. (Only administrators can register, unregister, and access the index)If you enable (check) this, please check “Require moderator approval”. If you do not require sender verification, anyone can create fraudulent registration and unsubscription emails to your list.``Disabled by default``
リモート管理者は (The remote administrator):
- 参加者リストを参照・検索できます.(You can refer to and search the participant list.)
If this is enabled (checked), you can refer to and search the participant list.
Disabled by default
- テキストディレクトリにあるファイルを編集できます(たとえば,メッセージのトレーラ,ヘルプファイルなど).(You can edit files located in the text directory (for example, message trailers, help files, etc.).)
If you enable (check) this, you will be able to edit files in the text directory.
Disabled by default
参加時の要求 (Requirements when joining)
Please check 「モデレータの承認を要求します」(Require moderator approval) to prevent unauthorized use of your mailing list.
- メーリングリストに参加する際の要求事項(Requirements for joining the mailing list):
- 参加者メールアドレスに送信されたメッセージに返信して確認することを要求します(Request confirmation by replying to messages sent to participant email addresses)
If this is enabled (checked), you can refer to and search the participant list.
Disabled by default
- モデレータの承認を要求します(Request moderator approval)
If this is enabled (checked), moderator approval will be required for participation in the mailing list.
Enabled by default
- メーリングリストの配信停止を要求します(Request to unsubscribe from the mailing list)
参加者メールアドレスに送信されたメッセージに返信して確認することを要求します(Request confirmation by replying to messages sent to participant email addresses)
メッセージの保管 (Message storage)
Be sure to uncheck 「リストのメッセージを保管します 」(Keep list messages) and disable it.
リストのメッセージを保管します アーカイブの検索は (Store messages in list Search archives)
You can choose to save messages in the list.
Default is enabled, but be sure to disable it.However, please do not enable this feature.
ezmlm-cgiを通じてウェブアクセスのアーカイブをインデックス化します(Index archives for web access through ezmlm-cgi)
Caution
If storage is enabled, the disk space of the mail server service will be used. These are subject to capacity limits and may cause overcapacity. If you exceed the limit, you will not be able to receive new emails.
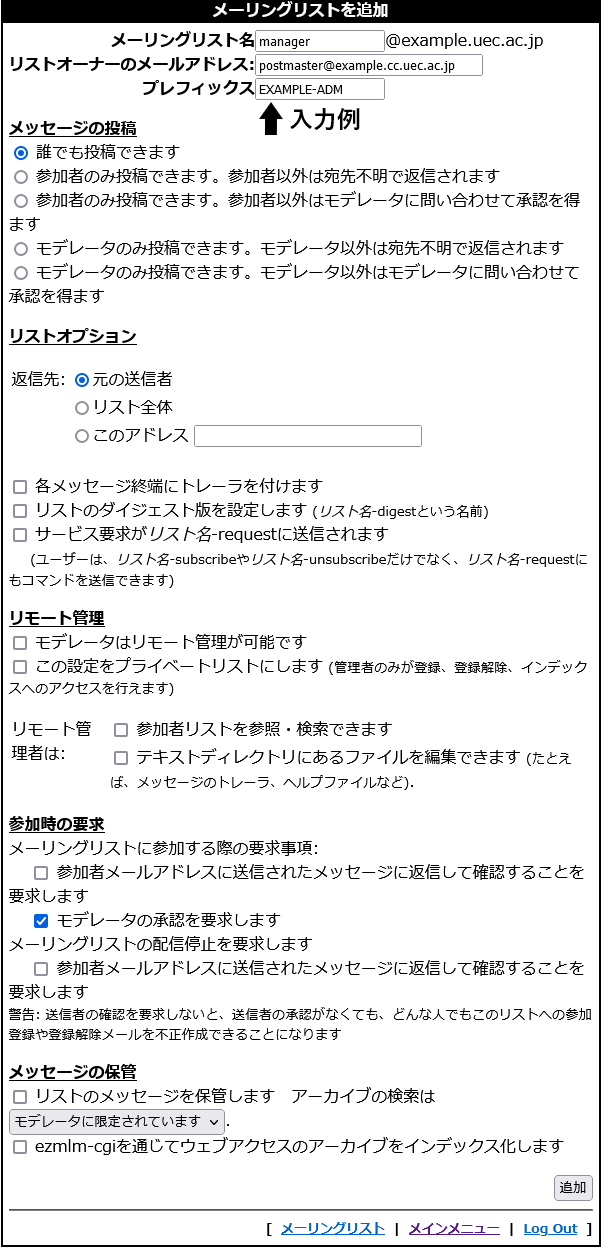
If there is no problem with the entered/selected contents, click the 追加 (Add) button. Move to the 「メーリングリスト」(Mailing List) screen.
2.3.2 Member Registration
Click 「メーリングリスト」(Mailing List) on the main menu to move to the 「メーリングリスト」(Mailing List) screen.
Click the button in the 「参加者を追加」(Add participant) column in the target mailing list row to move to the 「参加者をメーリングリストに追加」(Add participant to mailing list) screen.
Enter the participant’s mailing address on this screen and click 追加 (Add).
Repeat this until all members have been entered. When finished, click 「メインメニュー」 to go to the main menu.
Caution
The name of the mailing list to be registered must meet the following requirements.
Accounts with only one character cannot be used. (Because the system has reserved it)
The first character of the account must be [0-9a-zA-Z]
The characters that can be used in the account are alphanumeric characters, . (dot), _ (underscore), - (hyphen).
The account must not include -default, -owner, or -request. (Because the system has reserved it)
2.3.3 Deleting Members
There are two ways to delete members. Please use either method.
From the 「メーリングリスト」(Mailing List) screen, click the 「参加者の一覧」(List of Participants) button for the mailing list whose members you want to delete, and you will be redirected to the 「リストの参加者」(List Participants) screen.
If you click the delete icon to the left of the member you want to remove, that member will be removed from the mailing list.
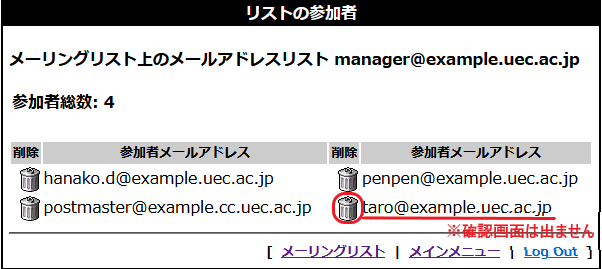
Caution
Please note that there is no confirmation screen.
From the 「メーリングリスト」(Mailing List) screen, click the 「参加者を削除」(Delete Participant) button for the mailing list from which you want to delete members, and enter the email address of the member you want to delete.
After entering, click the 削除 (Delete) button. You can confirm that it has been deleted from the 「参加者の一覧」(Participant List).
2.3.4 Registration as a Moderator
A moderator is an administrator of a mailing list. For example, if a non-participant posts to a mailing list where posting is prohibited to non-participants, the mail will be forwarded to the moderator.
Moderators are generally participants on the mailing list. Please be sure to register at least one moderator.
From the 「メーリングリスト」(Mailing List) screen, click the 「モデレータの追加」(Add Moderator) button to move to the 「リストのモデレータを追加」(Add List Moderator) screen.
Enter the email address you want to register as a moderator and click the 追加 (Add) button.
If you make a mistake, it may cause malfunction. please note.
2.4 Adding, Modifying, and Deleting Forwarding Destinations (Forwarding Accounts)
Forwarding is sending an email received at one email address to another email address.
Hint
ex) The domain name of the mail server service is example.uec.ac.jp, and the forwarding address is taro@example.uec.ac.jp.
If the forwarding address is hanako.d@test.com, all emails addressed to taro@example.uec.ac.jp will be forwarded to hanako.d@test.com.
When registering, use name: taro and forwarding destination: hanako.d@test.com.
2.4.1 Adding a Transfer Account
Click 「新しい転送先」(New forwarding destination) on the main menu and do this on the 「転送アカウントを追加」(Add forwarding account) screen.
Please enter the following information and click the 追加 (Add) button.
名前(Name) |
Forwarding account from which email is forwarded |
宛先(Address) |
Forwarding email address |
Note
You cannot specify multiple forwarding destinations in “New forwarding destination”. If you need to register multiple forwarding destinations, please use the method in 2.4.2 Registering Multiple Forwarding Destinations .
2.4.2 Registering Multiple Forwarding Destinations
If you need to register multiple forwarding destinations, follow the steps below to register them.
Register the first forwarding destination using the steps in 2.4.1 Adding a Transfer Account .
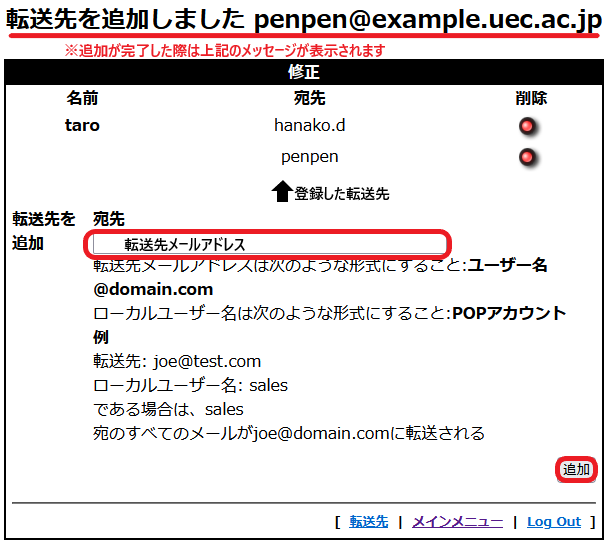
Click 「転送先」(Forwarding destination) on the main menu to move to the 「転送アカウント」(Forwarding account) screen.In the 「名前」(Name) column, click the icon in the 「修正」(Modify) column of the row containing the transfer source account to which you want to add a forwarding destination.
You will be redirected to the 「修正」(Edit) screen, so enter the forwarding email address you wish to add in 「宛先」(Destination) and click the 追加 (Add) button.As shown in the image, you can confirm that the new forwarding email address has been added in the field above.
2.4.3 Modifying/Deleting Transfer Account
You can modify, add, or delete transfers by pressing the modify button on the 「転送アカウント」(Transfer Account) screen.
If you want to delete the forwarding email address itself, click the delete button on the 「転送アカウント」(Forwarding Account) screen.
If you wish to delete some of the forwarding email addresses that have been registered, please press the edit button and do so on the edit screen for each individual forwarding email address.
Caution
The name of the transfer account to be registered must meet the following requirements.
Accounts with only one character cannot be used. (Because the system has reserved it)
The first character of the account must be [0-9a-zA-Z].
The characters that can be used in the count are alphanumeric characters, . (dot), _ (underscore) and - (hyphen).
The account must not include -default, -owner, or -request. (Because the system has reserved it)
2.5 How to Use Forwarding Destinations and Mailing Lists
So far, we have explained two ways to send the same email to multiple users. One is a mailing list and the other is a forwarding.
In this section, we will explain how to use these two.
In the world of e-mail, there are two types of recipients of e-mail.
- Header To:
This is written in the To field of the email header.
- Envelope To:
This is the one used for actual shipping. Sometimes the user doesn’t know.
For example, the header To of the university-wide broadcast email from the office is To: from-office@office.uec.ac.jp, and considering this alone, it is unlikely that it will be delivered to us staff. However, mail delivery programs (sendmail and qmail) expand the alias information and make the envelope To set to us before delivering the mail.
In post-9, forwarding and mailing list differ as follows.
- forwarding
If the envelope To contains the transfer name, it is received and redelivered to the transfer destination. In other words, set the forwarding destination in the envelope To and deliver it.
- Mailing list
Received if the envelope To contains the mailing list name. After receiving, the headers To and Cc are checked, and if the mailing list name is not included in the headers To and Cc, it is determined that the mail is not addressed to this mailing list and is discarded. If the header To or Cc includes a mailing list name, the message will be delivered to the members of the mailing list.
Normally, if the header To or Cc clearly indicates that the destination is a mailing list, use mailing list, otherwise use forwarding.
Specifically, it is better to use forwarding if you want to use it for redistributing emails, and to create a mailing list if you want to use it for discussion within a group.
2.6 Notes on Migration
We have observed that in some migration cases, non-critical but slightly complex issues occur.
2.6.1 Conditions Under Which The Problem Occurs
When running a mailing list with a mail server service, problems will occur if the following conditions apply.
The mailing list will work on the virtual domain server (post-9 or post-10) with the already registered mail server service (if there is a domain aaa.uec.ac.jp on post-9). If you are currently migrating a new mail server service (temporarily named bbb.uec.ac.jp) on the same virtual domain server.
If the mailing list on aaa.uec.ac.jp includes an email address for bbb.uec.ac.jp, the email delivery will be completed within the same virtual domain server. In the worst case, some emails will be lost until the migration is complete.
2.6.2 Mechanism of Problem Occurrence
Emails are delivered to the mailing list set up on the virtual domain server.
\(\Downarrow\)
A mailing list server program attempts to deliver mail to registered mail users.At this time, since the subdomain bbb.uec.ac.jp is on the same virtual domain server, post-9 attempts to deliver the mail locally instead of remotely.
\(\Downarrow\)
It will be delivered to the bbb.uec.ac.jp mailbox on the same virtual domain server.
2.6.3 How to Prevent Problems from Occurring
Temporarily change mailing list user registration.
Usually, an email address consists of a user name and a subdomain name, such as user@bbb.uec.ac.jp.
If the FQDN of the existing mail server is example.bbb.uec.ac.jp, temporarily change the e-mail address registered in the mailing list to user@example.bbb.uec.ac.jp. By explicitly specifying the mail server, you can prevent the mail from being delivered to the post-9 mailbox.
However, as soon as the migration to post-9 is completed, you will need to change the email address registered to the mailing list back to user@bbb.uec.ac.jp. Otherwise, the mail will be delivered to the existing server.
Have access to two mail servers.
We will ask the user to create two POP accounts in MUA and have them access both the existing mail server and post-9 using POP.
Either method is fine, but I think the latter is less likely to fail. Please plan your migration carefully.